Prepare a Photoshop file for a template build
This guide prepares a Photoshop (PSD) design so Storyteq can build a Template Builder template from it, for display banners or static images. Follow it before you hand your files over, so the template matches your design without rework.
To compare your file with a working example, download an example static image Photoshop file (ZIP, 132 MB) or an example HTML5 banner Photoshop file (ZIP, 144 MB).
Before you begin
Before you begin, ensure you have:
-
A final, approved design. Changes after the handover mean rebuilding parts of the template.
-
Adobe Photoshop.
-
A list of what should be editable in the template. Understanding template builds by Storyteq explains what the build team needs from your files and your brief.
Organise the Photoshop file
-
Use one PSD for each template.
-
Set the colour mode to RGB, not CMYK.
-
Set the bit depth to 8 bits per channel, because Template Builder doesn’t support 16-bit images. In Photoshop, select Image > Mode > 8 Bits/Channel.
-
Put every element on its own layer, at high resolution. Smart objects keep logos and other graphics sharp.
-
Name each layer and group after what it is, using the names from your brief. For example,
Scene 1,Background 1, orCompany logo white. -
Delete every layer the design doesn’t use, including hidden layers.
Set up sizes and scenes
-
Put each size the template needs on its own artboard, all in the same PSD.
-
Name each artboard after its size, for example
300x250. The template uses the artboard names as the names of its sizes.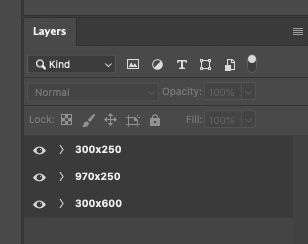
-
If the template is a banner, or a video built from animated static elements, group the layers for each scene. For example, put everything that appears in the first scene in a group called
Scene 1.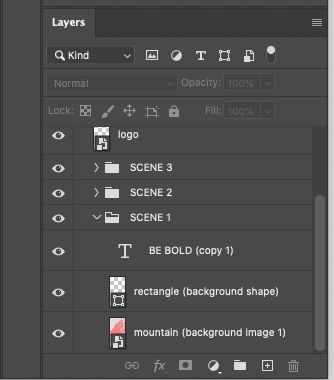
Mark where dynamic text and images can go
Show the build team the area each editable text field or image can fill, and the direction it can grow. Use a rectangle or guides for each one.
-
Rectangle: draw a shape with the Rectangle tool, then turn off its fill and keep its stroke.
-
Guides: draw a rectangle, then select View > Guides > New Guides From Shape.
Design text and images for Template Builder
Template Builder rebuilds your design from its own elements, so design editable text and images within what it can do.
For editable text:
-
Use one font size in each text field. A field can mix fonts and colours, but text in a different size needs its own field, and separate fields can scale out of step with each other.
-
Don’t use transparent or cut-out text that shows the image or video behind it. Use a matching text colour or a gradient instead.
-
Text can use a custom font, a colour or gradient, a background colour, a stroke, and a shadow.
For images:
-
Crop each image to its final size and position, separately for every size in the PSD.
-
If people choose between several images in the same place, crop every option to the same size and format, so each one sits correctly.
Add fonts and animation references
-
Add the font file for every custom font the design uses, as a TrueType (
.ttf), OpenType (.otf), or WOFF (.woff) file. Work with fonts covers checking that a font has every character your text needs. -
If the template animates, add a reference video (
.mp4) for each size, or at least for the main sizes, such as a vertical300x600and a horizontal970x250. The build team recreates the animation from these references, within what Template Builder’s animations can do.
Write the brief
-
List every element that should be editable in the template.
-
For each text field, give the maximum number of characters.
-
For each choice, list the options.
-
Add the channels the template is for, and the naming convention for finished files.
Package and hand over the files
-
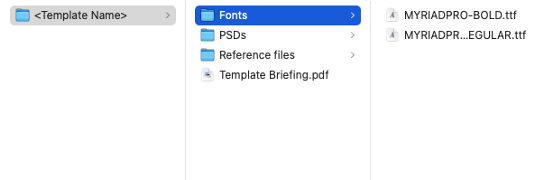
Create one folder for the template.
-
Inside it, create a folder for each type of file, such as
Fonts,PSDs, andReference files. -
Put the brief in the main folder.
-
Leave out anything from other projects.
-
Send the folder to your Storyteq project manager, using the route you agreed with them, such as SharePoint, WeTransfer, or email.